Thursday, September 29, 2011

Bacon Tomato Pasta (Homemade Pasta)

A few years ago when my husband and I met, I directed one of our many conversations to food, more specifically, his favorite foods. Like most men, bacon was on the list, along with pasta. Which got me working in the kitchen to create this recipe for him. In fact, this recipe even made it to our wedding, on the back of the seating cards for our reception. 

Nostalgia hits me each time I make this recipe. Remembering the insecurities and excitement of falling in love, recalling the first impressions and then a deeper knowledge of my husband, celebrating the years we have had since then.


I roll pasta and think of the first brush of fingertips and the comfort of a hand that still secretly squeezes mine when we are thinking the same thing and can't verbalize it. If happiness could be portrayed through food, Bacon Tomato Pasta would be one of my happiest dishes to create. I hope to pass some of that happiness to you.


Bacon Tomato Pasta
Source: original recipe

1    lb. bacon, chopped into small pieces
1    container cherry tomatoes, halved
1    teaspoon crushed red pepper
1    teaspoon Italian seasoning
2    teaspoons dried basil
2    tablespoons olive oil, more as needed
1    lb. cooked pasta, such as linguini, spaghetti, or angel hair


In a high sided pan, fry bacon over medium high heat, about 3-5 minutes. Add tomato halves, crushed red pepper, Italian seasoning, basil and olive oil. Cook for another 5 minutes until tomatoes have softened. Toss with cooked pasta, adding more olive oil, if needed.

Harmony's Thoughts
No need to use homemade pasta. The majority of the time I use Barilla dry pasta.


Harmony's Basic Pasta
Source: original recipe

1    cup high gluten flour (all-purpose or bread flour will work)
1/2 cup Semolina flour
1/2 teaspoon salt (optional)
2    eggs
2    tablespoons olive oil
1    tablespoon water
Combine flours and salt. Add eggs, olive oil and water. Mix to make a stiff dough. Knead dough 10 minutes or until dough is elastic. Cover with a towel or plastic wrap and let rest 30 minutes.


Using a rolling pin or pasta roller, roll out to desired thickness and cut as desired. 


Bring a large pot of salted water to boil; add pasta and cook until tender about 4 minutes. Pasta can also be dried and stored in the refrigerator up to 2 weeks.

Monday, September 26, 2011

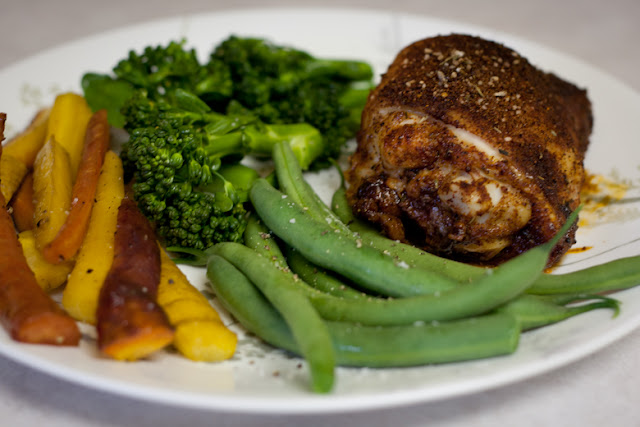
Spicy Chicken Thighs

This past week the Air Force gave my husband a training assignment for five months. He will be on assignment from November to March. There will be a flurry of activity in our house for the next month, preparing for his departure. When circumstances come that cause us to be apart, I am thankful for our strong commitment and support that we provide one another. These past few days I have been reflecting on the beauty of our love and the strength he is to me. I remember the reading my Grandma read at our wedding ~

Love is patient. Love is kind. Love does not envy or boast. It is not arrogant. Love is not rude, it is not self-serving. Love is not easily angered, or resentful. Love rejoices not in evil but in truth. Love bears all things, believes all things, hopes all things, endures all things. Love never fails. These three remain: faith, hope and love. But the greatest of these is love.  ~ adapted from I Corinthians 13

 I hope each of you have a love like this in your life....and if you don't, make a point to give the gift of true love to your family and friends.

For the next few weeks, the recipes that I post will be some of my husbands favorites since I will be cooking and baking especially for him before he leaves. These spicy chicken thighs are requested by him often.


Spicy Chicken Thighs
Source: original recipe
Prep: 10 minutes   Bake: 30-40 minutes   Oven: 425 degrees F

2    tablespoons Kosher salt
3    tablespoons brown sugar
2    tablespoons chili powder
1    tablespoon hot smoked paprika
1    tablespoon paprika
1    tablespoon cumin
3    teaspoons pepper
1    teaspoon thyme
1    teaspoon herbs de provence
1/2 teaspoon cayenne pepper
4-5 lbs. chicken thighs

Mix all spices and herbs together in a small bowl. Place chicken thighs in a 9x13 pan and rub all sides with the spices. Preheat oven to 425 degrees F. Bake for 30-40 minutes turning once about halfway through the baking time.

Harmony's Thoughts
To make ahead, mix spices and herbs, rub on chicken and place in the refrigerator until ready to use, up to 8 hours. 
I have also grilled these chicken thighs on medium high heat about 20-25 min. I rub the chicken with olive oil before coating with the spices when I grill them. 
If you don't have hot smoked paprika, substitute regular paprika. (although I suggest trying it :)

Wednesday, September 21, 2011

Announcing: Fall Baking Classes

One of the main reasons I started a blog was to share ideas and inspire others to have a passion for cooking/baking. This fall, I am offering baking classes in my home. You will find all the details below:

Fall Baking Classes
  • You are the class! - One on one baking instruction in my home
  • All ingredients/equipment provided - Just show up willing to learn
  • Take home your creations - Share what you have learned with others
  • Reduced Student Rates - ages 14 and up, college students
  • Approximately 2 hour class - We won't watch the clock....just the oven timer

Adult Classes - $45       
Student Classes - $37   

Fall Baking Class will include making one pie and one candy:
 Choice of Carmel Apple Pecan Pie or Sour Cream Pumpkin Tart
 Choice of Pumpkin Fudge or Nutty Pretzel Candy

For more information or to schedule a class together please contact me at harmonystarh@yahoo.com or post a comment

Tuesday, September 20, 2011

Chili Wraps

Back in May, when my husband and I visited his family up in Washington State, a family friend brought over a plate of chili wraps for us to enjoy. They were delicious and lived up to all that I had heard of them. I quickly asked her how she made them and she mentioned a few spices and her basic method of preparation. Hoping to replicate these wraps, I kept the instructions jotted down on a scrap of paper. 

Skip forward to a few weeks ago, a friend that I Jazzercise with gave me some ground elk burger and I brainstormed what to make with it. The chili wraps came to mind. Since elk is so lean, I did mix ground beef in with it to give it extra flavor. I have written the recipe using ground beef. We ate these chili wraps watching the Broncos game on Sunday and it was the perfect football snack!


Chili Wraps
Source: adapted from family friend, Norma Colon

1     lb. ground beef
1/8  teaspoon garlic powder
1/4  teaspoon onion powder
1     teaspoon adobo seasoning
1/2  teaspoon hot smoked spanish paprika
3     teaspoons chili powder
1     teaspoon salt
2     cups shredded sharp cheddar cheese
8     large flour tortillas
1-2 cups vegetable oil, for frying


In a large skillet, over medium heat, cook ground beef until no longer pink. Drain most of the fat from the meat. Add the spices and salt and cook on low heat, about 5 minutes. Remove from heat. To fill the tortillas, place 1/4 cup of the meat mixture in the center of the tortilla; top with about 3 tablespoons cheese. Fold the two sides of the tortilla in toward the center; then fold the other two ends into the center.


Repeat with all the tortillas. In a cast iron skillet, add the vegetable oil until it is 1/2 inch deep; heat until rippling in the pan. Place one or two wraps in the pan and fry 2 minutes on each side or until golden brown. Serve with salsa and sour cream.


Harmony's Thoughts
Ground turkey can be substituted for the ground beef.
Use the largest tortilla wraps you can find. I used flour tortillas in wrap size.


A Giveaway on Melt's Facebook Page

A giveaway is happening over on Melt's facebook page. Like Melt on facebook and you will be entered to win a set of Crate and Barrel magnetic measuring spoons. I use these measuring spoons everyday! The drawing will be tomorrow, Wednesday September 21st. I will post the winner on our facebook page.

P.S. There is a link to like Melt's facebook here on the blog to your right. Just click the link and you should be set!

Sunday, September 18, 2011

Peach Cobbler

Have you ever tried to recreate something you ate at a restaurant? Not just use their idea to make something that you end up liking even better, I mean actually trying to get it to be the same exact texture and flavor. Usually when I eat something noteworthy, I will play on the basic ingredients and do my own thing with the rest, but after eating a fantastic peach cobbler at a restaurant in the mountains of Arizona this past February, I was determined to recreate it exactly as I remembered. 

Not only did that require patience and careful note taking, it also required that my husband and I eat four peach cobblers in two weeks! But on the fourth try...success! Warm peach cobbler with spices and a biscuit topping is absolutely delicious, but it was not the cobbler I was trying to recreate. I knew it had a cake-like texture with an almond flavoring, but other than those details I had no direction. Thankfully the fourth try was it, or this post would not exist. Hopefully you enjoy it as much as I did!


Peach Cobbler
Source: original recipe
Prep: 20 minutes   Bake: 35 minutes   Oven: 350 degrees F

1/2    cup butter
1/2    cup all-purpose flour
2       tablespoons cake flour
2       teaspoons baking powder
1/4    teaspoon salt
1 1/4 cup sugar, divided
1       cup milk
1 1/2 teaspoons almond flavoring
3       cups ripe peaches, peeled and sliced (about 3 peaches)

Preheat oven to 350 degrees F.

Put butter in bottom of a 8x8 square baking dish and set in oven to melt. In a bowl, mix together flours, baking powder, 1 cup sugar, and salt. Combine the almond flavoring with the milk and add to dry ingredients. Pour batter over melted butter; do not stir. Arrange peaches on top of batter; do not stir. Sprinkle the remaining 1/4 cup sugar over the top of the peaches. Bake until crust is light brown and puffy, about 35 to 40 minutes. Serve warm.

Harmony's Thoughts
Be careful not to brown the butter when melting in the oven. I try to take it out while a small amount of the stick still remains and let it sit until the heat from the pan finishes melting it.
If you don't have cake flour, substitute with all-purpose flour. I was trying to create the lightest texture possible.

Saturday, September 17, 2011

Potato Leek Soup

Last Saturday I had the opportunity to spend the morning at the Denver Art Museum with a dear friend. We were going specifically for the Marvelous Mud Exhibit...which was exactly that! As I spent a few hours, basking in the creativity of artists and their works of clay (or more appropriately, mud), I was reminded that we all need a creative outlet. For some it is a paintbrush, for others it is words and writing. For me, creating in the kitchen is my delight.

The curator of the Marvelous Mud Exhibit beautifully displayed thought provoking quotes from literature about mud. One of my absolute favorites was the following quote from Lao Tzu:
 Do you have the patience to wait until your mud settles and the water is clear?  Can you remain unmoving until the right action arises by itself?
 Such a perfect quote to remind us in our busy lifestyles to take a step back and let life settle a little. To keep our minds and hands from interfering with what will happen naturally, if we let it. 

After viewing the exhibit, my friend and I shared a relaxing lunch at Palette's, at a small table next to big windows with lovely afternoon light. As we ate potato leek soup, a Caesar salad, and seared tuna, we talked of life, art, and the quotes that meant the most to us. I made my recipe for potato leek soup this week and reflected on my Saturday at the Denver Art Museum and Palette's for lunch.


Potato Leek Soup
Source: original recipe
Prep: 20 minutes   Cook: 30 minutes

3     leeks, sliced thinly and rinsed
1     onion, diced
3     tablespoons butter
5     cups potatoes, peeled and diced (about 1 1/2 to 2 lbs potatoes) 
4     cups chicken stock
1/2  cup heavy cream
       salt and pepper to taste
      Garnish with green onions, bacon, and cheese (optional)

In a large stockpot, melt butter. Add onion and leeks and cook until soft . Stir in potatoes and chicken stock and bring to a slow boil. Simmer until potatoes are tender. Remove from heat. Stir in heavy cream. With an immersion blender or in a food processor, puree soup to a smooth texture. 

Harmony's Thoughts
To rinse the sliced leeks, place in a large bowl of cold water and swish around to let the sand fall to the bottom of the bowl. 
Cleaning the leeks
I use my immersion blender to puree soup to a "partly smooth with a few chunks of potato" kind of texture. 
Feel free to add more heavy cream for a richer flavor.
The potato leek soup at Palette's was garnished with bacon, shaved leeks and a swirl of basil oil. A basil oil with this soup is delicious!

Thursday, September 15, 2011

Maple Pecan Cake

The past two years I have made a maple pecan cake for my Grandpa's birthday. Last year my sister and I met our grandparents in Laramie, WY to spend some time all together and what fun we had! We sat around the indoor pool at our hotel and played Rummikub, talked and swam. It was such a relaxing and memorable time that I sit here smiling at my computer as I reminisce. To celebrate, I had made a small, easy cake that I thought would travel well. Grandpa loved it!

This year while my sister was visiting yet again, our grandparents came down to Denver to spend a few days with us. I remembered how well he loved his cake last year and created the same one. How delightful it was to be all together two years in a row, celebrating our Grandpa and the memories we share. No matter where life takes me...when I have a bite of this cake I will be back in Laramie and Denver, gathered around the table with the one's I love.


Maple Pecan Cake
Source: Cooking for 2 magazine (Spring 2007)


Prep: 40 minutes   Bake: 20 minutes  Serves: 6


Cake:


3/4    cup plus 1 tablespoon flour


1/4    cup sugar


1/4    cup packed brown sugar


1/2    teaspoon baking soda


1/4    teaspoon salt


1/2    cup buttermilk


1/4    cup butter, melted
3       tablespoons pure maple syrup
1/2    teaspoon vanilla
1/3    cup finely chopped pecans, toasted

Glazed Pecans:
3       tablespoons light corn syrup
1/3    cup pecan halves

Frosting:
3       oz. cream cheese, softened
3       tablespoons butter, softened
1       tablespoon plus 1 teaspoon pure maple syrup
1 1/2 cups powdered sugar


In a large bowl, combine the flour, sugars, baking soda and salt. Combine the buttermilk, butter, syrup and vanilla; stir into dry ingredients just until combined. Fold in chopped pecans.

Pour into two 6-inch round baking pans, greased and lined with parchment paper. Bake at 350 degrees for 20-25 minutes or until cake tester is clean. Cool for 10 minutes before removing from pans to wire racks to cool completely.


In small saucepan, bring corn syrup to a boil. Cook and stir for 1 minute or until slightly thickened. Remove from heat; stir in pecan halves until coated. Place in a single layer on a foil-lined baking sheet. Bake at 425 degrees for 2-3 minutes or until golden brown. Cool.


For frosting, in a small mixing bowl beat the cream cheese, butter and syrup until smooth. Beat in confectioners' sugar. Place one cake layer on a serving plate; spread with 1/2 cup frosting. Top with second layer; frost top and sides of cake. Garnish with glazed pecans. Store in the refrigerator.


Harmony's Thoughts
You don't have to go out and buy special 6-inch round baking pans if you don't want to (if you do, Michael's Craft store has them in their Wilton department). An option is just to bake in one 8 or 9 inch round pan for a one layer cake. Or you could double the recipe and bake in two 8 or 9 inch pans.
I have substituted mascarpone cheese for the cream cheese and it was delicious.
Often, to save time, I don't bother with glazing the pecans. The cake is good both ways.


Monday, September 12, 2011

Homemade Spaghetti Sauce

When I go into the garden with a spade, and dig a bed, I feel such an exhilaration and health that I discover that I have been defrauding myself all this time in letting others do for me what I should have done with my own hands.  ~ Ralph Waldo Emerson

Emerson says it perfectly! I love my small garden plot in one of our local community gardens. Back in April, as I tilled and planted, the fragrance from the soil was thick and heady, just like my anticipation for a summer full of vegetables. Each task required to nurture a garden brings me joy. As summer is drawing to an end, my gardening consists of watering, picking and using the vegetables I have worked for the past five months.

Last night a friend from church gave me two bags of tomatoes. Today I combined them with tomatoes from my garden and canned spaghetti sauce using the following recipe.I made sure to take notes on my method, since I typically throw ingredients in the pot until I am satisfied with the flavor and texture. You could also scale this recipe down to make enough for dinner.


Homemade Spaghetti Sauce
Source: Original Recipe
Yield: 7 quarts

3   onions, finely chopped
2   heads of garlic, minced
1   shallot, finely chopped
3   tablespoons basil
3   tablespoons oregano
6   bay leaves
2   cups red wine (optional)
2   8oz. cans tomato paste
14 lbs. san marzano tomatoes

Combine first seven ingredients in a large stockpot over medium heat. In another pot of boiling water begin boiling tomatoes, 7-10 at a time, for 2 minutes. Remove tomatoes from boiling water and submerge into cold water. Peel off skin and remove core, adding each tomato to the sauce mixture in the stockpot. Repeat until all tomatoes are skinned and cored. Using a wooden spoon or potato masher begin crushing the tomatoes into the sauce. Add tomato paste. Simmer for about 2 hours until thick and fragrant. Remove bay leaves before serving or canning. Refrigerate any leftover sauce.

Thursday, September 8, 2011

Salisbury Steaks with Garlic Mashed Potatoes

My husband is a meat and potatoes kind of guy. He sweetly puts up with my phases of eating vegetarian, or dieting but ask him what he wants for dinner and it will be some version of meat and potatoes. Cooking for him is a joy. It is my expression of love to create a meal that not only is healthy but also satisfying and comforting. He faithfully gives me feedback and appreciation for my time in the kitchen.  

The first time I made Salisbury steaks with garlic mashed potatoes, we had been married for just a month. I have made it many times in the 2 years since then and I still get great comments and a thank you each time. One of my favorite aspects of this recipe is that it makes two servings. I have doubled and tripled the recipe with no problems.


Salisbury Steaks
Source: Adapted from Cooking for 2 magazine (Spring 2008)
Prep: 10 minutes   Cooking: 20 minutes   Serves: 2

1/3 cup finely chopped onion
2    tablespoons minute rice
1/8 teaspoon salt
1/8 teaspoon pepper
1    egg white
1/2 pound ground beef
3    teaspoons olive oil
2    cups beef broth
2    teaspoons worcestershire sauce
1    tablespoon cornstarch
1    tablespoon cold water

Combine onion, rice, salt and pepper, and egg white in a small bowl. Crumble beef over mixture and incorporate ingredients into meat. Shape into 2 oval patties. Brown patties in skillet with oil 3-4 minutes on each side. Drain. Stir in broth and worcestershire sauce. Bring to a boil. Reduce heat and cover. Simmer for 10-15 minutes until cooked through. Remove patties from broth mixture and keep warm. To make gravy, combine cornstarch and cold water and add to broth in pan. Cook until thickened, about 2 minutes. Serve patties with gravy.


Garlic Mashed Potatoes 
Source: Cooking for 2 magazine (Spring 2008)
Prep: 5 minutes  Cooking: 15 minutes   Serves: 2


2     medium potatoes, peeled and cut into cubes
3-4 garlic cloves, peeled and halved
3/4  teaspoon salt
2     tablespoons butter
3     tablespoons cream

Boil potatoes and garlic in a saucepan, 10 minutes or until tender. Drain. Mash potatoes and garlic. Add butter, cream and salt. Beat until smooth. 


Harmony's Thoughts
I typically grate the onion to give it a more even and fine texture.
For specific diets, you can very easily substitute ground turkey for the beef and milk for the cream.