Wednesday, November 9, 2011

Sour Cream Pumpkin Tart

The past two Thanksgivings my husband and I have shared together have been without family. We split every other Christmas with my parents or his, but Thanksgiving has been spent with a group of military guys that are without family as well. Each Thanksgiving and Christmas dinner I plan includes this Sour Cream Pumpkin Tart. This year, since my husband is in training and I'm with family in Pennsylvania, I am hoping that I can convince my family that they want this on menu!

As you are menu planning for Thanksgiving, consider this Sour Cream Pumpkin Tart (or pie). It is simple but spectacular topped with a dollop of maple whipped cream.


Sour Cream Pumpkin Tart (or Pie)
Source: adapted from Baking: From my Home to Yours by Dorie Greenspan
Prep: 15 minutes   Oven: 400 degrees F then reduce to 300 degrees F

1    9 inch pie shell or 11 inch tart shell, partially baked
2    cups pumpkin puree
3    eggs, room temperature 
1    cup light brown sugar
1    cup heavy cream
1/2 cup sour cream
1    teaspoon cinnamon
1    teaspoon ginger
1    pinch of ground cloves
1    pinch of nutmeg
1    pinch of salt
3    tablespoons dark rum (optional)
2    teaspoons vanilla

Preheat oven to 400 degrees F. Whisk all ingredients for 2 minutes. Pour into crust. Bake at 400 degrees F for 10 minutes, then reduce the temperature to 300 degrees F and continue to bake for 35 to 40 minutes (20 to 25 minutes for a tart) or until set.

Cool to room temperature and serve with whipped cream.

Harmony's Thoughts
To make Maple Whipped Cream, add 3-4 tablespoons pure maple syrup after beating your 1 cup of cream stiff. Sweeten to taste with more maple syrup. Another option is to use maple flavoring instead of vanilla in your whipping cream. Sweeten with powdered sugar in this case.
Although I have scaled this recipe down some, I still end up with a little extra filling. I typically pour the extra filling into greased ramekins and bake with the tart.

Saturday, November 5, 2011

Tea Party Menu Planning


My Grandma asked me a few weeks ago to cater an afternoon tea for her while I was visiting in Wyoming. The tea was this past week and I wanted to share the menu that I created and a few snapshots as well. I will work to post many of the recipes over the next few weeks.


Afternoon Tea Menu
Open Faced Cucumber Sandwich
Curried Chicken Salad on a Puff Pastry
Egg Salad, Ham Pate and Vegetable Cream Cheese Sandwich
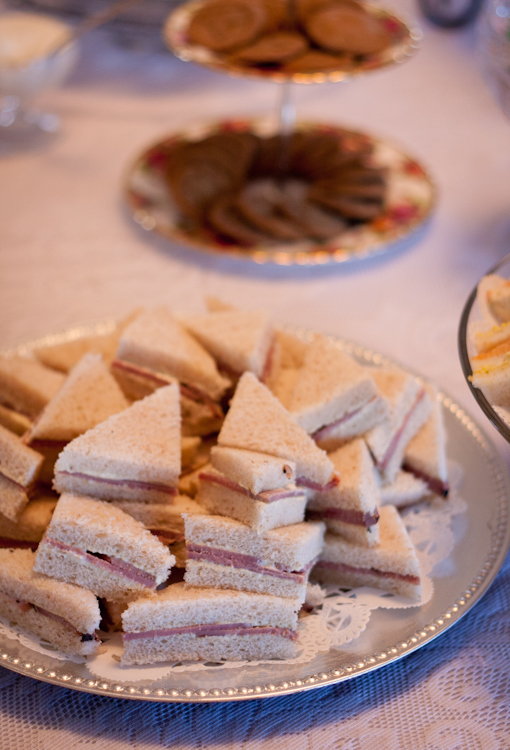
Roast Beef with Spicy Mustard Sandwich

Herbed Goat Cheese Stuffed Cherry Tomatoes
Carrot Sticks and Celery with Ranch

Vanilla Bean Scones
Lemon Poppy Seed Scones      (all with clotted cream, lemon curd and strawberry preserves)
Blueberry Almond Scones

Raspberry Mousse Tarts
Apricot Thumbprint Cookies
Mini Gingersnap Cookies
Chocolate Truffles


Egg Salad, Ham Pate and Vegetable Cream Cheese Sandwiches


Scones with Clotted Cream, Lemon Curd and Strawberry Preserves


Carrot Sticks and Celery with Ranch


Curried Chicken Salad on Puff Pastry


Open Faced Cucumber Sandwiches


Roast Beef with Spicy Mustard Sandwich


Herbed Goat Cheese Stuffed Cherry Tomatoes


Mini Gingersnaps and Apricot Thumbprints


Tuesday, November 1, 2011

Eggs Benedict

Just an update on our move and new adventures...my husband is currently in GA in training and will remain there until the middle-end of March. I am in Wyoming this week at my grandparents ranch. The Melt kitchen is mobile and catering my grandmother's tea party at the end of this week. The menu is planned and the prep work is beginning. I will do my best to document the process to share some recipes and ideas with you! In the meantime, here is a favorite breakfast (although, I admit I have eaten it for lunch and dinner) loved by so many and extremely versatile.

Eggs Benedict is such a classic breakfast that I'm not sure if it really needs much of a recipe. At the same time, I make my Hollandaise sauce from scratch and wanted to share the recipe and hopefully inspire you to play with it as well.
 

Hollandaise Sauce
Source: original recipe

3    egg yolks
1    teaspoon lemon juice
1/2 cup butter, cold
Pinch of cayenne
Pinch of ground nutmeg
Pinch of salt

In a small saucepan, whisk egg yolks with lemon juice. Over the lowest heat setting possible, add butter in one whole piece and stir constantly until it begins to slowly melt. Continue stirring until butter completely incorporates into egg yolks without curdling the egg. The sauce will thicken gently. Remove from heat and add cayenne, nutmeg and salt. Set a small bowl over a larger bowl of very warm water; pour the sauce into the small bowl, cover and keep warm.

Eggs Benedict 

4    English muffins, split, toasted and buttered
8    slices of Canadian bacon, warmed
8    eggs, poached
1    recipe of Hollandaise sauce

Assemble by placing the English muffin on the plate, topped with a slice of Canadian bacon, and an egg. Pour a generous amount of Hollandaise sauce over the egg, garnish with chives or a sprig of parsley and serve.

Harmony's Thoughts
If you don't like "runny" eggs, cook them a bit longer (than the average 2 1/2 minutes) to firm the yolk up. This was my trick for easing my husband into any kind of a "dip egg". I got him hooked on Eggs Benedict and then slowly brought the eggs from firm to runny a little bit each time I made it....It worked!
The variation on this recipe is endless. I have seen savory scones and biscuits replace the English muffin, crab and salmon cakes replace the Canadian bacon, cheese added to the Hollandaise sauce and so on. Honestly........feel free to play with it and let something unusual inspire you. If you do, share with us in the comment section below this post!

Saturday, October 22, 2011

Pumpkin Cream Cheese Muffins

Just a warning....these muffins are addictive! I found this recipe last fall and have made them quite often since then. Truthfully, I even made them in the middle of April because they sounded so good and I had some frozen pumpkin puree to use up. I whipped up a batch of these muffins a few weeks ago so that my husband could enjoy these before he left. 

On a personal note, blogging is going to be sporadic the next couple of weeks. I officially have seven days left with my husband before we are separated (military) for five months. We found out that he was leaving four weeks ago and since then, our time has been a blur of packing, preparing and squeezing in every moment together. The house is almost all packed up. About half of the Melt kitchen is going into the storage unit; the other half is traveling in the car with me as I venture to Wyoming to spend time with my grandparents and then drive across the country to live with my dear sister and be close to my parents. I will continue to blog from "guest kitchen's" as I will not be in my own. We will have to see how it all works out! I hope to be able to share my adventures and continue to produce quality pictures and interesting recipes.

In this time of transition and uncertainty, I cling to my faith in Jesus Christ and the love of my husband. My emotions are a mixture of excitement and sadness, hope and wistfulness, adventure and loneliness. I take many beautiful friendships with me from my time in Colorado; simultaneously looking forward to the new relationships and people around the next curve of my life path. My journey continues to evolve, adding more beauty to it with each passing moment. 

Now...back to amazing pumpkin muffins. If you get the chance to share these muffins with a friend or family member, slip your hand in theirs and tell them how much they mean you. 


Pumpkin Cream Cheese Muffins
Source: Country Living
Prep: 20 minutes   Bake: 20-25 minutes   Oven: 375 degrees F

8        oz. cream cheese, softened 
3        large eggs
2 1/2  cups all-purpose flour
2 1/2  cups sugar
1/4     cup pecans, chopped
3         tablespoons butter, melted
2 1/2  teaspoons cinnamon
1/2     teaspoon salt
2        teaspoons baking powder
1/4     teaspoon baking soda
1 1/4  cup pumpkin puree
1/3     cup vegetable oil
1/2     teaspoon vanilla

Heat oven to 375 degrees F. Lightly coat a standard muffin tin with oil or papers and set aside.

Mix the cream cheese, 1 egg and 3 tablespoons sugar in a small bowl and set aside. Toss 5 tablespoons sugar, 1/2 cup flour, pecans, butter and 1/2 teaspoon cinnamon in a medium bowl and set aside.

Combine the remaining 2 cups sugar, flour, remaining cinnamon, salt, baking powder and baking soda in a large bowl. Lightly beat the remaining eggs, pumpkin, oil and vanilla together in a medium bowl. Make a well in the center of the flour mixture, pour the pumpkin mixture into the well and mix with a fork just until moistened. 

Evenly divide half the batter among the muffin cups. Place 2 teaspoonfuls of the cream cheese filling into the center of each cup and fill with the remaining batter. Sprinkle some of the pecan mixture over the top of each muffin and bake until golden brown or a tester comes out clean, about 20-25 minutes. Cool on wire rack.

Harmony's Thoughts
Take extra care not to overfill the muffin cups. By the time you pour in 3 different layers, they can get very full and overflow.
I sometimes throw in a few more spices to make these taste even "warmer". Typically a grate or two of nutmeg and a dash of cloves.

Sunday, October 16, 2011

Caramel Pecan Apple Pie


Apple pie is always warm and inviting. It's basic and perfect all at the same time. Now add a little caramel and pecans and you have an extraordinary pie. From its flaky crust to its warm, sweet center, it brings homey, sentimental feelings. A pie can be the perfect showing of love, whether you give it to welcome a neighbor or to celebrate a birthday! This apple pie was an instant hit in my kitchen. I was apprehensive about the caramel as many desserts with caramel are too sweet for me. The blend of warm cinnamon, toasty pecans, tart apples and sticky caramel was perfect. 

Enjoy making this pie; pour your love into it! Serve it to loved one's with a small touch and a smile. Something about it is therapeutic and giving. I hope you savor it like we do in our house! 


Caramel Pecan Apple Pie
Source: recipe from a family friend, Barb Norman
Prep: 25 minutes   Bake 55-65 minutes   Oven: 350 degrees F

7     cups peeled and sliced tart apples
1     teaspoon lemon juice
1     teaspoon vanilla
3/4  cup chopped pecans
1/3  cup brown sugar
3     tablespoons sugar
4     teaspoons cinnamon
1     tablespoon cornstarch
1/4  cup caramel ice cream topping
1     unbaked, 9-inch pie shell (your favorite recipe or use mine here)
3     tablespoons butter, melted
Crumb Topping:
3/4  cup flour
2/3  cup chopped pecans
1/4  cup sugar
6     tablespoons cold butter
1/4  cup caramel ice cream topping

In a large bowl, toss apples with lemon juice and vanilla. Combine pecans, sugars cinnamon and cornstarch. Add to apples - toss to coat.

Pour 1/4 cup caramel topping over the bottom of the pie crust.  Top with apple mixture. Drizzle with butter.

In a small bowl combine flour, pecans and sugar. Cut in butter to create coarse crumbs. Sprinkle over pie filling. Bake at 350 degrees F for 55-65 minutes or until filling is bubbly. Remove from oven and immediately drizzle with the remaining 1/4 cup caramel ice cream topping. Cool on wire rack.

Harmony's Thoughts
I don't change anything about this recipe...it is fabulous!
Feel free to make changes as your creativity allows...and post a comment with them so we all benefit from it!

Wednesday, October 12, 2011

Harmony's Pie Crust

Over the next few weeks (and forever after that) I will be posting pie recipes. Many pie recipes call for a baked, partially baked, or unbaked pie shell. Some call for a double pie crust. Whatever the case may be, I have created a pie crust recipe that works for me. 

In my childhood years baking with my mother was frequent and normal. I was not scared to work in the kitchen and my love of food developed through my mom asking me to work alongside her as she baked pies, breads and cookies. I helped with pancakes for breakfast, soup for lunch and casseroles for dinner. 

My mom makes such a tasty pie crust. It is flaky and light in every way. What it is not - is pretty. Not that it is particularly ugly; it just never seems to be easy to work with, which leaves creating the perfect edge out of reach. I grew up using her recipe, struggling with my crust ripping, and generally frustrated with the concept of pie crust making.

After I became a stay at home wife, I purchased a cookbook called Great Pies and Tarts by Carole Walter. Her cookbook is an excellent resource and has about 20 pie crust recipes for all different occasions. I was sure that one of her basic recipes would work for me. Five or six pie crust recipes later, the perfect crust continued to elude me. I shook my head each time I read that the crust had to be refrigerated for 30 minutes, let sit to rest, or rolled on a pastry cloth, pastry mat or marble surface.

"It should not be this difficult or complicated," I complained to my husband one evening. He listened to me rant and then quietly asked, "Why not create your own pie crust recipe?" Shaking my head I remember mumbling some comment about not being any more profound than all the pastry chef's and their recipes. If they could make their pie crust recipes turn out perfectly, it must be my inadequacy.

But the seed had been planted. I change every other recipe I come across and create recipes all the time. I cut extra steps out of Martha Stewart recipes because I secretly believe that she adds them to make her recipes seem more prestigious! I shout at cookbooks when they call for 4 tablespoons of sugar when it should just say 1/4 cup. Could I really simplify a pie crust?

I fussed for a few days in the kitchen, threw out all the rules I had read, and came up with a recipe and method that works for me. Not to say that my recipe replaces any other out there. If you have success with a pie crust recipe, then stick with it! But if you have ever been in my shoes, looking down with aggravation as your crust rips or cracks, maybe my method will work for you!

Harmony's Pie Crust
Source: original recipe 
Prep: 10 minutes   Bake: see below for options
Yield: Single pie crust (double recipe for a double crust)

1 1/4 cups all purpose flour
1 1/2 teaspoons sugar
1/2    teaspoon salt
1/4    cup cold butter, cubed
1/4    cup Crisco shortening
3       tablespoons cold water

In a large bowl, combine flour, sugar and salt. Cut in shortening and butter with a pastry blender until fat is well blended (your mixture should look like pea-sized crumbs) Add cold water and stir with fork until mixture forms a ball (add a few drops more if it is too dry). Once it forms a loose ball, gather the dough up with your hands and transfer it to a surface covered with floured plastic wrap. Flatten the ball into a disk, and begin to roll out, rotating the plastic wrap to keep the shape circular. If it starts to stick to your rolling pin, sprinkle the crust with a little more flour or cover with plastic wrap and roll out between the two layers. 

Once you think your pie crust is a large enough circle, gently place your pie plate on top in the center and check to see if you have about 1 to 1 1/2 inch of the pie crust on all sides. If not, roll it bigger until you have an overlap on all sides. Peal off the top layer of plastic wrap (if you placed some on top) and transfer the pie crust to the pie plate by sliding your hand under the plastic wrap and turning it into the pie plate. Make sure it is centered and adjusted before you peel the plastic wrap from the crust. Press gently into the pie plate and tuck the overlap under on all sides. Form your pie edge by placing your index finger on the inside of the crust and your thumb and index finger (other hand) on the outside of the crust and squeezing gently. Repeat this method around entire crust.

If you are filling your crust (i.e. apple pie, pumpkin, peach, etc.) follow the temperature settings and bake time the recipe calls for.

If you are blind baking (empty pie shell) your crust (i.e. banana cream pie, coconut cream pie, etc.) line the crust with foil, fill with pie weights, dry beans or rice and bake at 425 degrees F for 15-20 minutes, until golden brown. 

If you are partially baking your crust (some recipes call for this, I typically find it unnecessary) line the crust with foil, fill with pie weights, dry beans or rice and bake at 400 degrees F for 10- 13 minutes, until set but pale.

If you would like to make your pie crust ahead of time, wrap in plastic and refrigerate up to 3 days or freeze up to 1 month. Return to a cool room temperature before rolling out. You can also roll it out, form the crust and freeze for up to a month. Just be sure to cover it well while in the freezer.

Monday, October 10, 2011

Sriracha Glazed Chicken Wings

Some people claim that marriage is all about compromise. I agree that you do have to compromise in some situations, but in my opinion, it has more to do with liking each other and respecting the commitment you make to your other half. That being said, in our house, these wings are made with a compromise. My husband has agreed to cut the wing tips off and separate the drumettes from the wings. I don't want to mess with cutting the chicken joints. I have agreed that if he does this, I will make the sauce and bake them. We live in perfect harmony. 

These chicken wings are not for the faint of heart (I do not eat them). They are spicy and have enough heat to please those who eat the Original Hot at most wing joints. I'm a mild kind of girl so this recipe gets made for others. My husband doesn't mind that he gets them all to himself!


Sriracha Glazed Chicken Wings
Source: adapted from Martha Stewart - Everyday Food Magazine
 Prep: 10 minutes   Marinate: 30 minutes   Bake: 30 minutes   Oven: 475 degrees F

1/3    cup soy sauce
2       tablespoons plus 1 teaspoon white vinegar
3       tablespoon Sriracha sauce
1       tablespoon Frank's hot sauce
1       tablespoon sugar
1 1/2 teaspoons grated fresh ginger
1 1/2 teaspoons toasted sesame oil
1 1/2 pounds chicken wings, cut in half at joint (wing tips removed), or drumsticks

In a glass baking dish, whisk together soy sauce, vinegar, Sriracha sauce, sugar, ginger, and sesame oil. Add chicken and toss to coat. Marinate 30 minutes, tossing halfway through. Preheat oven to 475 degrees. Bake until chicken is cooked through, about 30 minutes, flipping chicken halfway through.


Harmony's Thoughts
Sriracha sauce can be found in the Asian section of the grocery store.
If you don't have sesame oil, substitute vegetable oil.
These are perfect for a football crowd!